Getting Started
Link to Downloadable Quake and addons:
NOTE: Parts of those are still (c) iD. You should own Quake before using them. If you don't, buy it from the store.
downloadable Quake, the base version
downloadable Quake, with additional stuff
Texture Pack for JoeQuake-gl
How to Extract and Play Maps:
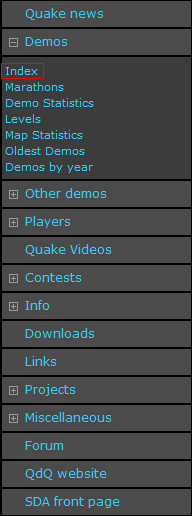
First of all, go ahead and navigate to Quake page over at Speed Demos Archive. The first thing that should come up is the Quake News page, along with a menu to the left, that should look like this:

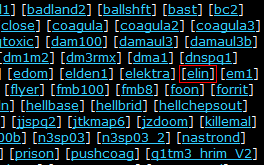
Click "Demos" to bring open the submenu, and then click "Index".. you should be clicking this:
After that, the complete demo index should be viewable in the frame where the news used to be. For this example, we are going to download and extract the map called "Elin" by Robert Axelsson. Scroll down to where the runs are arranged by level (alphabetically) and locate "elin." Depending on your resolution, it should look something like this:
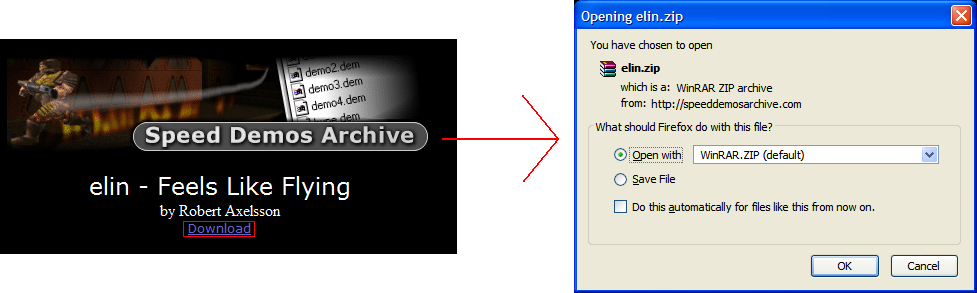
Upon clicking the link to the elin run page, you will be given a list of all the runs that have been completed on the map, as well as the map to download at the top. For now, this will be our assignment.
Click the "Download" link at the top, and you should be prompted to download "elin.zip".. click Open or Save File, it really does not matter at this point, because either way you're going to open it up with WinZip, WinRar, the Windows default Zip program, or whichever Zip compression program you use.
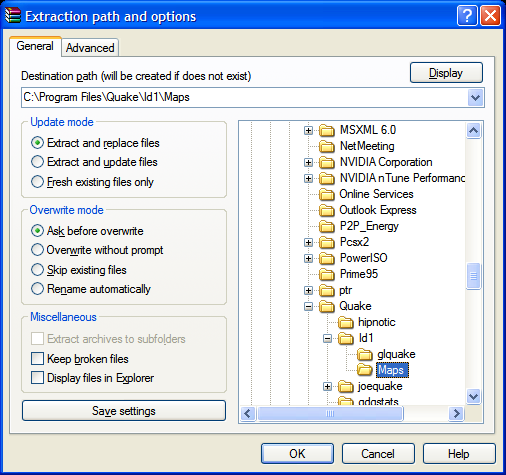
In the zip, you should find two files - elin.bsp and elin.txt. The text file has information such as the author, whether it's made for just single player, cooperative, deathmatch, how many difficulty settings are supported, construction information, copyright information, etc. But what we want is elin.bsp, so go ahead and select the .bsp (or both) and click "Extract To" and a dialog should pop up allowing you to choose where you would like to extract to. Navigate (or type in) to your Quake\Id1\Maps folder, mine is located at "C:\Program Files\Quake\Id1\Maps", and click OK. This will extract (and install) the map to the correct folder and will allow you to play it.
At this point, all you need to do is open up Quake and start up a single player or multi player game. Once you are in game, open up the console (~ or `, located to the left of the "1" key) and type in "map elin" and voila, you're playing Elin - Feels Like Flying by Robert Axelsson.
How to Extract and Watch Demos
If you followed the Maps part of this guide, this should be very simple as it's much of the same process, so I won't be using as many screenshots. Again, what you need to start off doing is heading to the Quake page. Navigate the left menu again, Demos --> Index, and then locate elin again in the main frame. On this page, you will notice several tables like this:
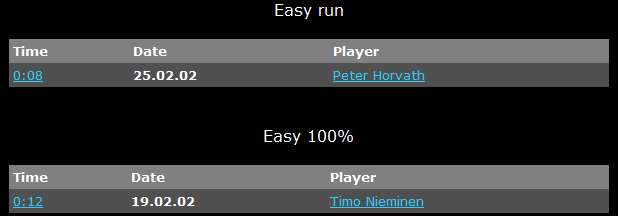
All of these tables have headings, such as Easy Run or Nightmare 100%. These headings denote the discipline and the type of runs that these demos are. Only two disciplines are ran on SDA; easy and nightmare. The former usually has less enemies and will usually allow for a much faster time. The latter usually has several more enemies and by extension may cause problems attempting to the get the same time. The type of demo is either Run or 100% - a run is going through the map as fast as possible, only getting as many kills or secrets as required by the map or by the runner to get the fastest time. A 100% run requires all kills and secrets, but it does not require you to visit every spot on the map or anything like that. That's the quick explanation, so let's go ahead and watch some runs!
Click on the 0:08 link (not the Peter Horvath link, that will take you to his list of demos, both current and old records, etc) and you should be prompted to download elin_008.dz. This part of the guide assumes that you've installed dzip, the best demo compression tool. You will find two files in here - elin_008.txt and elin_008.dem. You will find a text file such as elin_008.txt in most .dzs and in them you will almost always find the map the run was done (though it is obvious, I know), the player who ran it and possibly his or her handle, the time that they completed the map in, the type of run, the discipline, and maybe some comments. The format of the text files are usually unique to the player. I would always recommend reading the text file before watching the demo, because the comments may provide some insight or something similar. What we want to do is extract the .dem, it should look something like this:
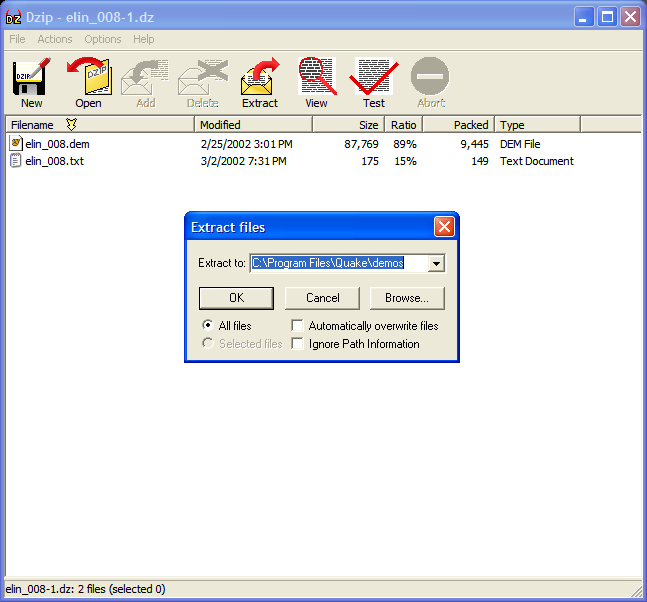
I personally use C:\Program Files\Quake\demos to hold my random demos that I download from SDA, but you can use whatever you like. The browse dialog is very similar to the one in WinRar, so locating where you would like to put your demos should be a sinch, but remember that they must be located somewhere in the Quake directory so that you can navigate to them via Quake. So you've extracted elin_008.dem to C:\Program Files\Quake\demos or someplace, so what you want to do now is open up JoeQuake. I'm going to give screenshots of JoeQuake in links, because they will be of size 1280x1024.
So when you open up JoeQuake, you should be at the console of JoeQuake, and it should tell you all the options that you decided to run with (example). Next, just hit escape and you should see a menu like so: example. Navigate to the Demos selection and hit enter, JoeQuake will default to the type of game you ran it with (usually qdqstats, sometimes -hip/-rogue or other, example). Hit the .. and navigate to the demos folder (or whichever folder you decided to save the demo to) and hit enter (example). Your demo should be located here, simply navigate to it and hit enter and the demo should begin playing (example). Alternatively, you can save it to the Quake\qdqstats folder (or whichever folder you're running the game with) and type in the console playdemo elin_008 and that will accomplish the same thing, but I find navigating the menus is easier and saving demos that I plan to watch to a different folder so that my main folder (qdqstats) doesn't get too cluttered.
Watching single-player, coop, mad coop (3+ players) demos are no different. Keep scrolling down passed the single player tables and you'll find the coop and mad coop tables, like this:

Simply download the click the 0:06 and download the .dz and extract it and watch them just like single player demos. You'll notice that there's two demos and a text file, the demos are elin_006 and elina006, the _ denotes the player who hosted the server (Jason Hochreiter) and the a denotes the client (Adam Lewandowski). In mad coops, the same system is used, _ followed by a, then b, then c, etc.
How to use QdQstats
The downloadable Quake at the top of this page should include all the folders and files you need, such as QdQstats v1.8, which is required by all runners, as it gives a more accurate time (5 decimal places) and fixes several issues on maps, such as missing kills and other things of that nature.
If you are using the downloadable quake provided at the top of this page, then all the files you need will be located in C:\Program Files\Quake\id1\pak0.pak. If you are not using the downloadable Quake at the top if this page, you can find a link to QdQstats (and the QdQstats for other maps) under Downloads in the menu to the left, or you can grab QdQstats v1.8 here. Simply extract all the contents of the .zip to C:\Program Files\Quake\qdqstats (or wherever your Quake installation is\qdqstats) and run -game qdqstats in the launcher or through the command line. (Example: joequake-gl -width 1280 -height 1024 -bpp 32 -mem 1024 -game qdqstats)
Beyond giving a more accurate time, QdQstats also gives you, the runner, access to several extra commands. These commands range from turning off the showing of dead bodies to turning on the permanent quad cheat (for testing and cheated demos only, of course.)
- IMPULSEs 90-95 let you work the menu that controls the functioning of this patch.
-> IMPULSE 90: selection left
-> IMPULSE 91: selection right
-> IMPULSE 92: decrease selection by 10
-> IMPULSE 93: decrease selection by 1
-> IMPULSE 94: increase selection by 1
-> IMPULSE 95: increase selection by 10
These commands allow you to navigate the menu, allowing you to set the amount of ammo/health/armor/etc of your person.. used during QdQ projects so that the statistics between demos match up. For some selections, increase/decrease instead work to toggle or activate options.
- Other commands:
-> GOD: God-mode.. stops the runner from taking any damage.
-> NOCLIP: Allows the runner to pass through walls and other entities.
-> IMPULSE 9: Gives the runner all weapons, max ammo, all keys, etc.
-> IMPULSE 98: Turn on velocity printing, a (poor) alternative to show_speed 1 in JoeQuake.
-> IMPULSE 99: Print player's origin.
-> IMPULSE 150: Turn off body removal.
-> IMPULSE 151: Dead bodies removed after 1 minute.
-> IMPULSE 152: Bodies removed after 5 seconds.
-> IMPULSE 153: Above plus no gibs.
-> IMPULSE 154: Bodies removed instantly.
-> IMPULSE 155: Above plus invisible nails.
-> IMPULSE 156: Above plus invis. scrag/hk fire.
Impulses 150-156 are really only used by runners with older computers or on maps that are very big, allowing the runners to remove some of the more intensive entities that slow down computers, resulting in smoother performance for the runner. To turn off these options, simply use impulse 150.
-> IMPULSE 205: Genocide (kill all monsters).
-> IMPULSE 209: Toggle the ogre-grenade counter.
-> IMPULSE 210: Toggle the grenade counter.
-> IMPULSE 211: Toggle visible triggers.
-> IMPULSE 212: Toggle trigger info.
-> IMPULSE 254: Permanent quad cheat.
-> IMPULSE 255: Quad cheat.
Many of these commands are very useful for planning and testing many different things in a map. Obviously, Using god, noclip, permanent quad cheat, visible triggers, trigger info, etc are all banned in demos that are sent to SDA, so please remember to turn them off or to not use them when recording real demos.
Basic Console Commands
Mostly everything you need can be found in the Options menu in JoeQuake, such as mouse sensitivity and customizing controls, but those of us with an FPS background (HL/Counter-Strike, yeah?) may prefer to use the console to change sensitivity and bind controls.
So to begin, if you would like to change your sensitivity, simply type sensitivity into the console and it will show you your current sensitivity as well as the default. Make your change based on how much higher or lower you would like your sensitivity to go, then type sensitivity [number], where [number] is the number you would like your sensitivity to be (no brackets, of course). Play around with your sensitivity until it feels right, so that you can get used to it and begin playing!
Another basic command that everyone should know is the bind command. The bind command allows you to bind (or set) a command to a key, such as bind "mouse1" "+attack" which will set your left mouse button to attack when you click it. You can bind almost any action to almost any key.
Beyond those two basic commands, some other useful commands include:
-> show_speed 1: This command brings up a speedmeter, allowing you to judge how fast you are going by a number - 320 is walking speed, so anything higher than that and you're doing better than if you were walking!
-> show_fps 1: This command shows you your current FPS (Frames Per Second) which is capped at 72 by the Quake engine (while recording).. anything higher than that and the runner will have an advantage over the other runners, because higher FPS allows a runner to move faster, to put it simply. Keep it at 72.
-> show_stats 2: This command shows you some statistics in the top right of the map - time, secrets, kills - in that order. I would think this would be prefered to having a key bound to +showstats, which you'd have to keep pressing if you'd like an update on how many kills or secrets you have. show_stats 1 will only show the time, if that is what you would prefer.
-> cvar_savevars 2: This command will save ALL variables that you change so that the next time you load up Quake, your settings will be the same.
Another basic thing that you should know is about the autoconfig.cfg. The downloadable quake at the top should have placed an autoconfig.cfg in your qdqstats folder. The autoconfig.cfg is a config file (editable by any text edited) that is executed upon JoeQuake's start up and can include commands that you would always like to run. Mine has three commands: +mlook - which allows you to use the mouse to look around and shoot.. much prefered over the keyboard. +speed - this is the alternative to having "Always Run = On" in the Quake options. There's a long explanation somewhere in the Quake forums as to why it is better than Always Run, but you are just going to have to trust me on this one - it is better than Always Run and you should just get used to it this way so that you do not have to go back and relearn how to bunny hop the proper way later. Finally, the last command in my autoexec.cfg file is exec taffs.cfg - which is a command that tells Quake to execute yet another config file. This file has a bunch of my aliases and other binds.. this may be talked about in a different place at a later time, but it will not be discussed in this guide!
The final command to get you started running:
record!
This is possibly the most important command.. it's records all your movement and such on a map to a .dem file, which is viewable later so you and other people can see what you did. To use this command, simply type record [demo name], where demo name is the name of the demo that you would like save it as (without the brackets, of course). After you type in record [demo name], JoeQuake should mention something about how it's recording to C:\Program Files\Quake\qdqstats\[demo name].dem and once it says that, you are good to go. Simply type map [map name] and start running! (to stop the demo, simply type stop and you will stop recording) This may seem annoying to have to do every time, so there is another way. There's another way to use record, and that is record [demo name] [map name] and by binding this command to a key, you simply hit that command to restart the demo and map, and you can run over and over and over again! Three personal notes follow:
1. I use tab for my record bind because I find it very easy to hit after I mess up or something happens that I don't quite agree with. You can use any key you want, but you definitely do not want to accidentally hit it during a good run!
2. I name all of my demos 100m. By doing this, I keep my qdqstats folder empty of random failed demos. If I get a demo that I like, I simply stop recording, quit out of JoeQuake (it won't let you rename the demo if JoeQuake is still open), and rename the demo.
3. My roommate (Jason Hochreiter) and I use the naming scheme: [sda mapname]_[skill/discipline]_[time]. So for a two-player easy on the map elin, the name would go like this elin_er2_006 (for the server demo) and elin_er2a006 (for the client demo.)
You do not have to do it like I do, I am simply sharing the way I do it so that if you would like, you can do it my way, but I do not believe there is only one right way.
How to Submit Demos
How to Run Coop
How to Compile Marathons